Midjourney: Organizing your images with web folders
A key reason to create all your Midjourney images on the website now.

There are two ways to organize your image files. You first create a collection of images (dogs, cats, elephants, and so on), then you create a folder labeled "cats," select all of the cat images, and place them in that folder. The other way is first to make a folder and then create all cat images in it.
A large majority of Midjourney users prefer the latter (it was mentioned in one of the Midjourney Office Hours). Intermediate or advanced users create Discord servers that work like folders to keep track of the images they create.
Midjourney has introduced a new web folder feature to address this. We can now create a folder on the web and generate images within it. There is no need to use Discord servers to manage files anymore.
Read the full announcement here: https://www.midjourney.com/updates
The official documentation site is at: https://docs.midjourney.com/hc/en-us/articles/33329462451469-Organizing-Your-Creations
To summarize, the official websites highlight the following folder features:
The new Folder menu appears on both the Create and Organize pages.
On the Create page, select a folder and create images that will be saved in that folder.
The "New Folder Group" menu in the top right corner allows you to group multiple folders into one Folder Group.
You can put an image in multiple folders.
To download all the images in a folder, right-click on it and select "Download".
As usual, in addition to covering the basics, I will go above and beyond what is covered in the official Midjourney documentation and announcement. (This is one of the many reasons to subscribe to my newsletter! You will discover rare and unheard-of tips and tricks, as well as Pro insights about Midjourney.)
Okay, let's get started.
Creating a folder
Begin by creating a new folder on the top right of the Create or Organize page.
When you create your first folder, you will create a "New Folder Group." Then, you can create multiple folders within the folder group.
Folder groups are collapsible. This makes folder management easier, especially when you have many folders within a folder group.
Pro Tip: When naming a Folder Group, you can include a detailed description or a long list of keywords (or tags). I tried, there is no problem putting more than 120 words as the Group Folder's name!
Creating images in a folder
Select and click a folder on the Create Page to "activate it" (turn it red). Any newly generated images will be automatically saved in that folder.
To deactivate it, click the folder again. This means any new images created from now on will not be added to the folder.
A notification will appear below the Imagine Bar, informing you that the images you created will be saved in the selected folder.
In addition, the selected folder name will turn red in the top right corner and the folder list. These again confirm that your images will be added to the folder.
Pro Tip: You can re-run your favorite prompt repeatedly. All generated images will be automatically saved in the same folder. There's no need to worry about mixing up the collection with unrelated images.
Viewing the folder collection
The Create page on the left shows the images that are included in a particular folder.
It will also show you which images in a grid have been added to the folder and which have not.
Adding and deleting images from the folder
If you forget to select the folder before creating the images, simply click on the folder icon to add them back.
Removing an image from a folder is the same process. To remove a folder, simply click the "x" icon next to its name.
Batch operation
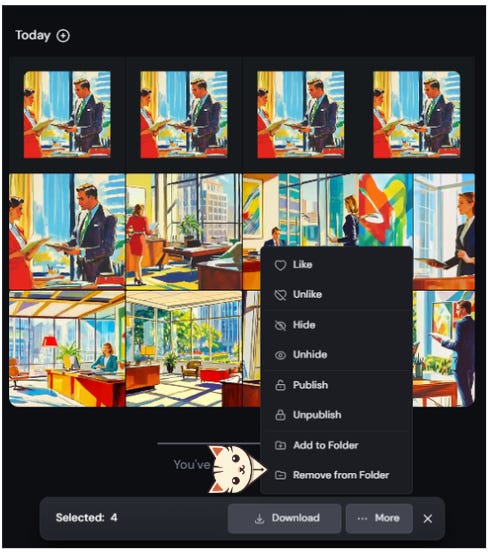
You can add multiple files to a folder by selecting them and right-clicking.
Alternatively, you can also add or remove multiple files using the Bulk Actions pop-up at the bottom.
Delete a folder
You can delete a folder when it is no longer required.
Pro Tip: Deleting a folder does not remove the images. The folder will be deleted. The images are still there but are no longer associated with that deleted folder.
How do you temporarily create images outside the activated folder?
While the folder is selected/activated, sometimes you may want to create some unrelated images or experiment with different keywords to tweak the prompt. You don't want those "testing images" in the folder, but you also don't want to deactivate the folder because you might forget to reactivate it later.
Let me ask you something: Honestly, how many times have you forgotten to turn off your /fast mode after activating it? The same logic could apply to reactivating the folder after deactivation.
Pro Tip: In Discord, you can create unrelated images or tweak your prompts that will not be added to your web folder, even when the web folder is activated. That means you won't have to deal with the mess of removing unwanted testing images from the folder collection because "whatever happens in Discord, stays in Discord".
Real-world applications
Let's take a look at two practical ways to use web folders to speed up your creative workflow while keeping things neat and tidy.
Separate the upscaled images from the rest.
Save only the best-edited image.


